Installing Brutal 3D Ceiling Tiles
Thank you for purchasing our product and giving us the honor of transforming your space!
If there are any problems with the delivered product or you are having installation difficulties, please call us immediately and we will strive to find a solution. We pride ourselves on providing excellent customer service.
First, a note on the care of your new ceiling tiles. Please store them by standing on any side edge rather than flat. Also store them in a cool, dry place.
Please share pictures of your installation with us when done!
If your question isn't answered on this page, the Blogs pages, or the FAQ page, feel free to contact us for any additional information regarding installation, or which layouts would work best for your particular space. We want you to have a premium experience from beginning to end.
Email Us. or call: 786-252-7173 We love talking to our customers!

How to Install Drop-In Brutal Tiles
- Make sure your existing standard 15/16" wide 24"x24" ceiling grid is perfectly flat and free of dust, grease and anything that may result in dirty hands. Your T-bars should be straight and intersect at right angles. Any distortions to the grid can make Brutal tiles difficult to place properly. A perfectly square grid makes installation a breeze.
- If there is any insulation or loose wiring hanging from above and touching the grid, it must all be lifted and secured in a manner that does not touch the Brutal tiles. If anything places a load on the tiles, they may not sit evenly.
- Before you throw out your old acoustic tiles, you may be able to just slip our tiles underneath them if you want the extra noise absorption and insulation. Click here for our Brutal Acoustic guide. Check on the options for each tile design in the respective product listing. Be mindful of your partial border tiles, which can be kept in place if the color and texture match the Brutal tiles well enough.
- If installing a new grid, plan your grid layout so that a minimal border results around the Brutal abstraction field. Since Brutal tiles are very three-dimensional, you can use regular flat drop-in tiles around the border or any partial tile sections that would require a custom-cut fit. We also offer flat PVC Bali and Zona tiles that are perfect for border tiles and compliment the bright white color.
- Orient your tiles in the same direction for an even pattern field, alternatively they can be rotated, flipped, and mixed to create a pattern that is much more dynamic. Please Click here for design inspiration as well as your particular tile's product page for additional layout options.
- Plan any lighting ahead of time, as the lights will need to be supported by structure above the grid, as the tiles cannot support any weight without distorting. See our lighting Guide here.
- Fire Sprinklers: When installing Brutal tiles in ceilings with sprinkler systems, cut the hole at least 1/4" diameter larger than the sprinkler escutcheon/trim (leaving a visible 1/8" gap around the edge). This allows the tile to fall away from the ceiling during a fire and not foul the sprinkler system.
- Remove your tiles from the box with clean gloves or freshly washed hands to prevent transfer of dirt or dust. Finger print smudges can be easily cleaned with isopropyl alcohol and paper towels. The tiles tend to hold a static charge, so dry wall dust may be attracted to them. A quick wipe with a dry paper towel or microfiber cloth will take it off.

- Flexible Brutal tiles are lightweight and easy to lift up into the grid, make sure that the tile edges lay flat for a flush install. The tiles may need to be shifted slightly in place to get them to lie square.

-
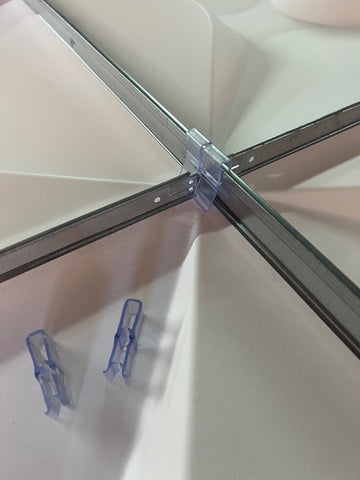
To secure your tiles from air gusts, such as in an air return plenum or near entry doors, we recommend adding grid clips, the ultimate solution for securing your Brutal tiles. These drop-in tile clips easily press into place over the bulb of your grid with a click. They only work on the tall T-Bar. We find it most effective to use one at each corner (which holds down two tiles at the same time) of the tiles. Mid span use may cause unattractive visible distortions. For most standard installs the clips usually aren't necessary. The clips shown here are Armstrong CHDC. We recommend these as they are wider than the stamped steel versions and so stay attached when pushed into the corners. They really keep the tiles in place! We recommend visiting Zoro.com as they have great prices and quick shipping.
-
If your ceiling needs places for recessed lighting, plan to have those placed in a position on the tile that is aesthetically pleasing and well supported by the existing ceiling structure. The recessed round center of Globen or the deep bowl of Europa naturally lend themselves to high-hats and other lighting features. All of our tile designs have locations that will work for lighting, if the fixture is appropriately sized. Pre-cut holes through the tiles to match the light locations. All lights should be hung from weight supporting features on the ceiling above the tiles. With all of our designs, lighting may need some experimentation to maximize the impact of the installation. See our lighting guide.


- Your ceiling should be looking great! We would love to see how it turned out. Please send some photos for a chance to be featured on our site, and of course tag us on social media - @BrutalDesignMiami on Instagram
- Please also take a look at BRUTAL'S Best Practices blog articles.